|
Thursday, July 28, 2011
RMAN daily backup script
Wednesday, July 27, 2011
Announced ... Avernum: Escape From the Pit

This blog has been sadly neglected lately, due to a combination of vacations and a frenzied effort to get our newest game to a point where we could officially announce it. But that day has arrived. Drop by our web site and take a look at Avernum: Escape From the Pit!
This is the second time that we have rewritten the Exile/Avernum trilogy, a move that is full of all sorts of questionable integrity. I am very nervous about announcing this title for exactly that reason, even though we have very, VERY good reasons to do a serious, polished rewrite of this game. Because Avernum has such a large and passionate fanbase, we have already put up an Avernum: Escape From the Pit FAQ to answer many of the questions that will be coming up. Such as, Why?
Short answer: Because the old version doesn't run on new machines anymore. Also, the iPad.
Longer answer. Look at this screenshot from Avernum:
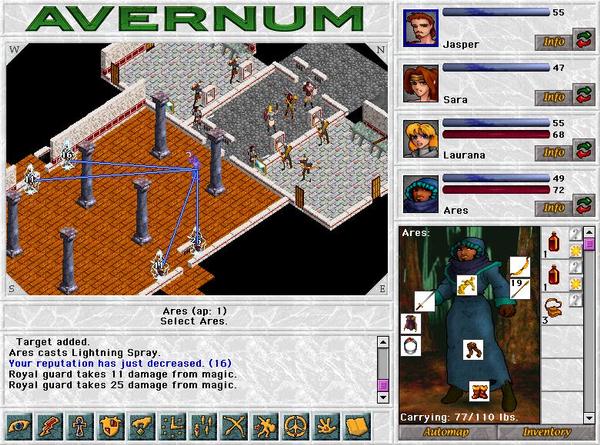
Ghhhhahhhhh! Make it go away! Make it go AWAYYYYYYYY!
I mean, seriously.
We've been very determined not to half-ass this adaptation, and, when all is said and done, we will have put almost as much time into it as into a whole new game. It's been a little rough, and yet, I don't see how I had a choice. The first Avernum trilogy is my first creation and still one of my most beloved, and if we didn't rewrite it then it would have just disappeared. I can't abide that.
Other terrifying decisions. For the first time ever, we will be selling a new title for $20. When we released our first game, wayyyy back in 1995, we charged $25. At the time, that was a fair and unsurprising price for a shareware game. These days, the constant downward pressure on prices can no longer be ignored. Also, the market is developing in ways that finally make me think that we can make more money at lower prices.
I now hope to return to a sensible and semi-regular blogging schedule. For example, soon I will write a sort of review of LA Noire. Before I can write it, I want to see if the game ever has a murder victim that isn't naked.
Saturday, July 23, 2011
Performance Views
V$RESOURCE_LIMIT Displays information about current and maximum global resource utilization for some system resources. Use this view to monitor the consumption of resources so that you can take corrective action, if necessary. Some resources, those used by DLM (Oracle Unix Distributed Lock Manager) for example, have an initial allocation (soft limit), and the hard limit, which is theoretically infinite (although in practice it is limited by SGA size). During SGA reservation/initialization, a place is reserved in SGA for the INITIAL_ALLOCATION of resources, but if this allocation is exceeded, additional resources are allocated up to the value indicated by LIMIT_VALUE. The CURRENT_UTILIZATION column indicates whether the initial allocation has been exceeded. When the initial allocation value is exceeded, the additional required resources are allocated from the shared pool, where they must compete for space with other resources. A good choice for the value of INITIAL_ALLOCATION will avoid the contention for space. For most resources, the value for INITIAL_ALLOCATION is the same as the LIMIT_VALUE. Exceeding LIMIT_VALUE results in an error. finish later
|
Wednesday, July 20, 2011
Configuring Linux bonding driver for the Oracle 10g VIP or private interconnect
PURPOSE
-------
In order to avoid the public LAN from being a single point of failure, Oracle highly recommends
configuring a redundant set of public network interface cards (NIC's) on each cluster node.
Network redundancy can be achieved On Linux platforms using NIC Teaming (configuring multiple
interfaces to a team or using the Linux kernel bonding module).

This note will go over the two possible choices for achieving redundancy on Linux.

As inter-node IP address failover is achieved by using the Oracle managed VIP, 3rd party
clusterware based inter-node IP address failover technologies should not be configured on the
same set of NIC's that are used by the Oracle VIP.  Only intra-node IP address failover
functionalities should be used in conjunction with the Oracle VIP.

SCOPE & APPLICATION
-------------------
This article is intended for experienced DBAs and Support Engineers.

1. NIC TEAMING BY CONFIGURING MULTIPLE INTERFACES TO A TEAM
-----------------------------------------------------------
Various hardware vendors provide network interface drivers and utilities to achieve NIC teaming.
Please consult your hardware vendor for details on how to configure your system for NIC teaming

2. NIC TEAMING USING THE LINUX KERNEL BONDING MODULE
----------------------------------------------------
The Linux kernel includes a bonding module that can be used to achieve software level NIC
teaming. The kernel bonding module can be used to team multiple physical interfaces to a single
logical interface, which is used to achieve fault tolerance and load balancing.  The bonding
driver is available as part of the Linux kernel version 2.4.12 or newer versions. Since the
bonding module is delivered as part of the Linux kernel, it can be configured independently
from the interface driver vendor (different interfaces can constitute a single logical
interface).

The configuration steps are different among Linux distributions.  This note will go over the
steps required to configure the bonding module in RedHat Enterprise Linux 3.0.

In the following example, two physical interfaces (eth0 and eth1) will be bonded together to a
single logical interface (bond0), and the VIP will run on top of the single logical interface.

A sample network configuration is as follows:

  Default Gateway:
    192.168.1.254

  Netmask:
    255.255.255.0

  Interface configuration before bonding:
    eth0: IP Address 192.168.1.1
    eth1: IP Address 192.168.1.2

After configuring the bonding driver, a logical interface named bondX (where X is a number
higher than zero) representing the team of interfaces.

  Interface configuration after bonding:
    bond0: IP Address 192.168.1.10

Note:  Before continuing, be sure the bonding module is mounted.  The command "modprobe bonding" can be used to mount the module.

2-1 CONFIGURING THE BONDING DRIVER
----------------------------------
Since the bonding driver is delivered as a kernel module, the following lines need to be added
to /etc/modules.conf as root.

alias bond0 bonding
options bond0 miimon=100

For details on the "options" parameter, please refer to the documents referred to in section
2.8. In the above configuration, the MII link monitoring interval is set to 100ms.  MII is used
to monitor the interface link status, and this is a typical configuration for mission critical
systems that require fast failure detection.

   Note: MII is an abbreviation of "Media Independent Interface".  Many popular fast ethernet
         adapters use MII to autonegotiate the link speed and duplex mode.

By default, the bonding driver will transmit outgoing packets in a round-robin fashion using
each "slave" interface.  The above example uses this default behavior.  For details on changing
this behavior, please also refer to the documents referred to in section 2.8.

If you want to use muitlple bonding interfaces you should modify /etc/modules.conf like below example.

alias bond0 bonding
alias bond1 bonding
options bond0 miimon=100 max_bonds=2
options bond1 miimon=100 max_bonds=2

(In this example we have 2 bonding interfaces.)

The "max_bonds" parameter defines how many bonding interfaces we are
going to have.
For details on the "max_bonds" parameter, please refer to the documents
referred to in section 2.8.

2-2. CONFIGURING THE bond0 INTERFACE
------------------------------------
On RHEL 3.0, network interface parameters are configured in configuration files named
"ifcfg-<interface name>", found in the /etc/sysconfig/network-scripts directory.  In order to
enable the bonding driver, a configuration file "ifcfg-bond0" needs to be created with
appropriate parameters.  As root, create the file "/etc/sysconfig/network-scripts/ifcfg-bond0"
as shown below.

DEVICE=bond0
IPADDR=192.168.1.10
NETMASK=255.255.255.0
NETWORK=192.168.1.0
BROADCAST=192.168.1.255
ONBOOT=yes
BOOTPROTO=none
USERCTL=no
    (Please change the IP address, Netmask, Broadcast to match your network configuration)

2-3. CHANGING THE CONFIGURATION FOR THE EXISTING INTERFACES
-----------------------------------------------------------
As root, please change the configuration file "/etc/sysconfig/network-scripts/ifcfg-eth0" as
shown below:

DEVICE=eth0
USERCTL=no
ONBOOT=yes
MASTER=bond0
SLAVE=yes
BOOTPROTO=none

Please also change the configuration file "/etc/sysconfig/network-scripts/ifcfg-eth1" as shown
below:

DEVICE=eth1
USERCTL=no
ONBOOT=yes
MASTER=bond0
SLAVE=yes
BOOTPROTO=none

These steps are necessary to associate the bond0 interface to its slave interfaces (eth0 and eth1).

2-4. RESTART THE NETWORK
------------------------
Execute the following commands as root to reflect the changes.

# service network stop
# service network start

If the configuration is correct, the above commands should both return  [ OK ].

2-5. CONFIRMING THE NEW CONFIGURATION
-------------------------------------
The following messages should appear in your syslog (/var/log/messages).

Jan 28 16:00:09 rac01 kernel: bonding: MII link monitoring set to 100 ms
Jan 28 16:00:09 rac01 kernel: ip_tables: (C) 2000-2002 Netfilter core team
Jan 28 16:00:11 rac01 ifup: Enslaving eth0 to bond0
Jan 28 16:00:11 rac01 kernel: bonding: bond0: enslaving eth0 as a backup interface with a down link.
Jan 28 16:00:11 rac01 kernel: e1000: eth0: e1000_watchdog: NIC Link is Up 1000 Mbps Full Duplex
Jan 28 16:00:11 rac01 kernel: bonding: bond0: link status definitely up for interface eth0.
Jan 28 16:00:11 rac01 kernel: bonding: bond0: making interface eth0 the new active one.
Jan 28 16:00:11 rac01 ifup: ENslaving eth1 to bond0
Jan 28 16:00:11 rac01 kernel: bonding: bond0: enslaving eth1 as a backup interface with a down link.
Jan 28 16:00:11 rac01 kernel: e1000: eth1: e1000_watchdog: NIC Link is Up 1000 Mbps Full Duplex
Jan 28 16:00:11 rac01 kernel: bonding: bond0: link status definitely up for interface eth1.
Jan 28 16:00:11 rac01 network: Bringing up interface bond0:  succeeded

The "ifconfig -a" command should return the following output.

bond0     Link encap:Ethernet  HWaddr 00:0C:29:DC:83:E8
          inet addr:192.168.1.10  Bcast:192.168.1.255  Mask:255.255.255.0
          UP BROADCAST RUNNING MASTER MULTICAST  MTU:1500  Metric:1
          RX packets:27 errors:0 dropped:0 overruns:0 frame:0
          TX packets:1 errors:0 dropped:0 overruns:0 carrier:0
          collisions:0 txqueuelen:0
          RX bytes:3462 (3.3 Kb)  TX bytes:42 (42.0 b)

eth0      Link encap:Ethernet  HWaddr 00:0C:29:DC:83:E8
          inet addr:192.168.1.10  Bcast:192.168.1.255  Mask:255.255.255.0
          UP BROADCAST RUNNING SLAVE MULTICAST  MTU:1500  Metric:1
          RX packets:13 errors:0 dropped:0 overruns:0 frame:0
          TX packets:1 errors:0 dropped:0 overruns:0 carrier:0
          collisions:0 txqueuelen:1000
          RX bytes:1701 (1.6 Kb)  TX bytes:42 (42.0 b)
          Interrupt:10 Base address:0x1424

eth1      Link encap:Ethernet  HWaddr 00:0C:29:DC:83:E8
          inet addr:192.168.1.10  Bcast:192.168.1.255  Mask:255.255.255.0
          UP BROADCAST RUNNING SLAVE MULTICAST  MTU:1500  Metric:1
          RX packets:14 errors:0 dropped:0 overruns:0 frame:0
          TX packets:0 errors:0 dropped:0 overruns:0 carrier:0
          collisions:0 txqueuelen:1000
          RX bytes:1761 (1.7 Kb)  TX bytes:0 (0.0 b)
          Interrupt:11 Base address:0x14a4

(Note that other interfaces will also appear in a typical RAC installation)

2-6. CONSIDERATIONS FOR CRS INSTALLATION
-----------------------------------------
During CRS installation, choose "Public" for the "bond0" interface in the "Specify Network
Interface Usage" OUI page.  If the "eth0" and "eth1" interfaces appear in OUI, then make sure
to choose "Do not use" for their types.

2-6a. IF YOU WANT TO CONFIGURE BONDING DEVICES AFTER INSTALLATION OF CRS.
-----------------------------------------
You can change your interconnect/public interface configuration using oifcfg command.
Please refer Note 283684.1

2-7. VIPCA CONFIGURATION
------------------------
The single interface name (i.e. "bond0") representing the redundant set of NIC's is the
interfaces that should be specified in the second screen in VIPCA (VIP Configuration Assistant,
1 of 2). Make sure not to select any of the underlying non-redundant NIC names in VIPCA, as
they should not be used by Oracle in a NIC teaming configuration.

2-8. OPTIONS FOR THE BONDING DRIVER
-----------------------------------
Various advanced interface, driver and switch configurations are available for achieving a
highly available network configuration. Please refer to the "Linux Ethernet Bonding Driver
mini-howto" for more details.

http://www.kernel.org/pub/linux/kernel/people/marcelo/linux-2.4/Documentation/networking/bonding.txt

RELATED DOCUMENTS
-----------------
Linux Ethernet Bonding Driver mini-howto:

http://www.kernel.org/pub/linux/kernel/people/marcelo/linux-2.4/Documentation/networking/bonding.txt

Red Hat Enterprise Linux 3: Reference Guide -> Appendix A. General Parameters and Modules -> A.3 Ethernet Parameters:

http://www.redhat.com/docs/manuals/enterprise/RHEL-3-Manual/ref-guide/s1-modules-ethernet.html

Note.283684.1 - How to Change Interconnect/Public Interface IP Subnet in a 10g Cluster
Note.291962.1 - Setting Up Bonding on SLES 9
Note.291958.1 - Setting Up Bonding in Suse SLES8
RAC 11.2.0.2 Grid infrastructure, private interconnect bonding new feature HAIP
With Redundant Interconnect Usage, you can identify multiple interfaces to use for the cluster private network, without the need of using bonding or other technologies  . . This functionality is available starting with Oracle Database 11g Release 2 (11.2.0.2). When you define multiple interfaces, Oracle Clusterware creates from one to four highly available IP (HAIP) addresses. Oracle RAC and Oracle ASM instances use these interface addresses to ensure highly available, load-balanced interface communication between nodes. The installer enables Redundant Interconnect Usage to provide a high availability private network. Oracle Database, CSS, OCR, CRS, CTSS, and EVM components in 11.2.0.2 employ Redundant Interconnect Usage. By default, Oracle Grid Infrastructure software uses all of the HAIP addresses for private network communication, providing load-balancing across the set of interfaces you identify for the private network. If a private interconnect interface fails or become non-communicative, then Oracle Clusterware transparently moves the corresponding HAIP (Highly Available IP Address) to one of the remaining functional interfaces. If you have two different interface names to be used for the private interconnect you can provide both the interface names to the oracle grid infrastructure installer and oracle clusterware will create a Highly Available IP Address (HAIP). Oracle recommends: that you use the Redundant Interconnect Usage feature to make use of multiple interfaces for the private network. However, you can also use third-party technologies to provide redundancy for the private network. Note: If you define more than four interfaces as private network interfaces, be aware that Oracle Clusterware activates only four of the interfaces at a time. However, if one of the four active interfaces fails, then Oracle Clusterware transitions the HAIP addresses configured to the failed interface to one of the reserve interfaces in the defined set of private interfaces.Thanks & Regards, Zaman Ahmed Tatari Sr. Oracle Support Analyst OCP 9i/10g(DBA/Developer Track) Ora-Tech Systems (PVT) Ltd. UAN #: 111-ORACLE ext(216) Cell #: 92-300-2542241 |
Saturday, July 16, 2011
Upon startup of Linux database get ORA-27102: out of memory Linux-X86_64
When trying to increase the SGA to approach half available RAM with an Oracle 64bit version on a Linux 64bit operating system, even though shmmax is set to match half the amount of RAM, you get the following error when trying to start the instance:
2097152
Set shmall equal to the sum of all the SGAs on the system, divided by the page size.
The page size can be determined using the following command:
For example, if the sum of all the SGAs on the system is 16Gb and the result of '$ getconf PAGE_SIZE' is 4096 (4Kb) then
set shmall to 4194304 pages
As the root user set the shmall to 4194304 in the /etc/sysctl.conf file:
NOTE:
The above command loads the new value and a reboot is not necessary
SQL> startup nomount
ORA-27102: out of memory
Linux-x86_64 Error: 28: No space left on device
Changes
shmall is too small, most likely is set to the default setting of 20971522097152
Cause
shmall is the total amount of shared memory, in pages, that the system can use at one time.Solution
shmall = total Sga's size on server / page_sizeSet shmall equal to the sum of all the SGAs on the system, divided by the page size.
The page size can be determined using the following command:
$ getconf PAGE_SIZE 4096For example, if the sum of all the SGAs on the system is 16Gb and the result of '$ getconf PAGE_SIZE' is 4096 (4Kb) then
set shmall to 4194304 pages
As the root user set the shmall to 4194304 in the /etc/sysctl.conf file:
kernel.shmall = 4194304
then run the following command:# sysctl -p
# cat /proc/sys/kernel/shmall
4194304NOTE:
The above command loads the new value and a reboot is not necessary
Start n Stop Application server with sequence with location
|
How to disable SSO (Single Sign On) REP-51019
1. Navigate to mide tier home ORACLE_HOME/reports/conf/servername.conf
take a backup of this file before editing.
this is mine APPS file like name ok (rep_oratech-00_bihome.conf)
2. Open servername.conf to edit the file. Servername.conf is the
configuration file for your reports server.
3. To disable Reports Server security, you must remove or comment out the
security element as well as the securityId attributes from the job element
specifications. The security elements in the servername.conf should be
removed or if you are going to comment out, should appear as the
following:
comment with <!-- /--> as i did
<!--job jobType="report" engineId="rwEng" securityId="rwSec"/-->
<!--job jobType="rwurl" engineId="rwURLEng" securityId="rwSec"/-->
also
4. remove these line from file
<security id="rwSec" class="oracle.reports.server.RWSecurity">
<!--property name="securityUserid"
value="%PORTAL_DB_USERNAME%/%PORTAL_DB_PASSWORD%@%PORTAL_DB_TNSNAME%"
confidential="yes" encrypted="no"/--> <property
name="oidEntity"
value="reportsApp_oratech_00.com_241F3F81F1C211DD8F77ED095047F5C8"/>
</security>
save your file
6. Restart the reports server.
Then run your form to run report.
Creating/Removing Report Server in Application server
Creating New Report Server in Middle Tier
Development team needed a new report server instance in middle tier, in process
of doing so they came up with following observation and steps:
Assume %OMH% is Oracle Middle Tier Home
To create new report server instance:
Open command prompt:
C:\>rwserver server=%newreportserver_name% start
Shut down the opmn:
C:\>%OMH%\opmn\bin\opmnctl stopall
Add new server target to opmn.xlm
C:\>%OMH%\bin\addNewServerTarget.bat %newreportserver_name%
The DOS window will close automatically.
Open command prompt again:
Update the config with new settings
C:\>%OMH%\dcm\bin\dcmctl.bat updateconfig -ct opmn -v -d
C:\>%OMH%\ dcm\bin\dcmctl.bat resyncinstance -v -d
Removing Report Server in Middle Tier
Start the opmn
C:\>%OMH%\opmn\bin\opmnctl startall
Go to %OMH% /sysman/emd
Open file targets.xml for editing.
Check for <Target> tag where its attribute NAME
should matches as follows:
“<ias_instance_name>_Reports_Server: <reports_server_to_be_removed>”
In our example it is oracleas.dbserver _Reports_anand
Where
oracleas.dbserver is ias_instance_name
anand is reports server name
Select from Starting Tag <Target..> to ending tag </Target> and delete selected lines.
<Target TYPE=”oracle_repserv” NAME=”<ias_instance_name>_Reports_Server: <reports_server_to_be_removed>” …>
…
</Target>
Friday, July 15, 2011
How to Change ias_admin password of Application Server
A small trick to reset the password of the ias_admin user.Just go to the directory $ORACLE_HOME/sysman/j2ee/conf. In this directory you'll find the configuration file jazn-data.xml. Inside this configuration file you'll find the definition of the ias_admin user including his encrypted password:
snippet from jazn-data.xml
...
ias_admin
{903}YdvTMA...
Inside the tag you see the encrypted password of the ias_admin. To reset the password, just change the value inside the tag as follows:
snippet from jazn-data.xml
...
ias_admin
!mynewpassword1
The new password you have to provide in clear text has to start with a "!". Be aware that the new password must match the password rules: minimum 6 signs and one sign must be a number. After your changes, Stop and Start iasconsole
snippet from jazn-data.xml
...
ias_admin
{903}YdvTMA...
Inside the tag you see the encrypted password of the ias_admin. To reset the password, just change the value inside the tag as follows:
snippet from jazn-data.xml
...
ias_admin
!mynewpassword1
The new password you have to provide in clear text has to start with a "!". Be aware that the new password must match the password rules: minimum 6 signs and one sign must be a number. After your changes, Stop and Start iasconsole
- emctl stop iasconsole
- emctl start iasconsole
Automatic Memory Management(AMM) on 11g
Automatic Memory Management(AMM) on 11gIntroduction to Database Memory ComponentsThe basic memory structures associated with Oracle Database include:■ System Global Area (SGA) The SGA is a group of shared memory structures, known as SGA components, that contain data and control information for one Oracle Database instance. The SGA is shared by all server and background processes. ■ Program Global Area (PGA) A PGA is a memory region that contains data and control information for a server process. It is nonshared memory created by Oracle Database when a server process is started. Access to the PGA is exclusive to the server process. There is one PGA for each server process. Background processes also allocate their own PGAs. The total PGA memory allocated for all background and server processes attached to an Oracle Database instance is referred to as the total instance PGA memory, and the collection of all individual PGAs is referred to as the total instance PGA, or just instance PGA. It contains global variables and data structures and control information for a server process. example of such information is the runtime area of a cursor. Each time a cursor is executed, a new runtime area is created for that cursor in the PGA memory region of the server process executing that cursor. The performance of complex long running queries, typical in a DSS environment, depend to a large extent on the memory available in the Program Global Area (PGA) which is also called work area. Below figure illustrates the relationships among these memory structures.  Evolution of Memory Management FeaturesMemory management has evolved with each database releaseOracle 9i Beginning with Oracle9i, the dynamic SGA infrastructure allowed for the sizing of the Buffer Cache, Shared Pool and the Large Pool without having to shutdown the database. Key features being
Automatic Shared Memory Management (ASMM) was introduced in 10g. You enable the automatic shared memory management feature by setting the SGA_TARGET parameter to a non-zero value. Oracle Database 11g Automatic Memory Management is being introduced in 11g. This enables automatic tuning of PGA and SGA with use of two new parameters named MEMORY_MAX_TARGET and MEMORY_TARGET. The most important SGA components are the following:
* RESULT_CACHE_MAX_SIZE is new component which has been introduced as part of 11g Memory architecture. The result cache is composed of the SQL query result cache and PL/SQL function result cache, which share the same infrastructure.Results of queries and query fragments can be cached in memory in the SQL query result cache. The database can then use cached results to answer future executions of these queries and query fragments. Similarly PL/SQL Function Result can also be cached. You have to use RESULT_CACHE_MODE initialization parameter which determines the SQL query result cache behavior. The possible initialization parameter values are MANUAL and FORCE. Oracle Database 11g supports various memory management methods, which are chosen by initialization parameter settings. Oracle recommends that you enable the automatic memory management method.
1.Automatic Memory Management – For Both the SGA and Instance PGABeginning with Oracle Database 11g, Oracle Database can manage the SGA memory and instance PGA memory completely automatically. You designate only the total memory size to be used by the instance, and Oracle Database dynamically exchanges memory between the SGA and the instance PGA as needed to meet processing demands. This capability is referred to as automatic memory management. With this memory management method, the database also dynamically tunes the sizes of the individual SGA components and the sizes of the individual PGAs.To achieve this, two new parameters have been introduced named MEMORY_MAX_TARGET and MEMORY_TARGET. To do so (on most platforms), you set only a target memory size initialization parameter (MEMORY_TARGET) and optionally a maximum memory size initialization parameter (MEMORY_MAX_TARGET). If you create your database with Database Configuration Assistant (DBCA) and choose the basic installation option, automatic memory management is enabled. If you choose advanced installation, Database Configuration Assistant (DBCA) enables you to select automatic memory management. Switching to Automatic Memory Management 1)Check the current values configured for SGA_TARGET and PGA_AGGREGATE_TARGET.SQL>SHOW PARAMETER TARGET2)Decide on a maximum amount of memory that you would want to allocate to the database which will determine the maximum value for the sum of the SGA and instance PGA sizes. In our case we decide to set to 808M 3)Change the parameter in initialization parameter file. Using Spfile ======== SQL>ALTER SYSTEM SET MEMORY_MAX_TARGET = 808M SCOPE = SPFILE;======= If you have started the instance with Pfile, then edit the pfile and set the parameters manually In case you do not specify any value for MEMORY_MAX_TARGET and only use MEMORY_TARGET then database automatically sets MEMORY_MAX_TARGET to the value of MEMORY_TARGET. If you omit the line for MEMORY_TARGET and include a value for MEMORY_MAX_TARGET, the MEMORY_TARGET parameter defaults to zero. After startup, you can then dynamically change MEMORY_TARGET to a non-zero value, provided that it does not exceed the value of MEMORY_MAX_TARGET. MEMORY_MAX_TARGET is a static parameter i.e it cannot be changed Dynamically and Instance has to be bounced for modifying the value. So ensure that you have set it to appropriate value. 4)Shutdown and startup the databaseSQL> shutdown immediate;Note : - In case you set any parameter value to value which is higher then MEMORY_TARGET, then you get the following error. E.g Setting SGA_MAX_SIZE to value of 900 M results in following Monitoring and Tuning Automatic Memory ManagementSQL> startup ORA-00844: Parameter not taking MEMORY_TARGET into account, see alert log for more information 00844, 00000, "Parameter not taking MEMORY_TARGET into account, see alert log for more information" // *Cause: The parameter was larger than MEMORY_TARGET. // *Action: Set the parameter to a lower value than MEMORY_TARGET. The dynamic performance view V$MEMORY_DYNAMIC_COMPONENTS shows the current sizes of all dynamically tuned memory components, including the total sizes of the SGA and instance PGA. The view V$MEMORY_TARGET_ADVICE provides tuning advice for the MEMORY_TARGET initialization parameter. SQL> select * from v$memory_target_advice order by memory_size;2. Automatic Shared Memory Management – For the SGAIf you want to exercise more direct control over the size of the SGA, you can disable automatic memory management and enable automatic shared memory management.This feature was introduced in 10g with a parameter known as SGA_TARGET. When automatic SGA memory management is enabled, the sizes of the different SGA components are flexible and can adapt to the needs of current workload without requiring any additional configuration.Please refer to following document for setting SGA_TARGET Note 295626.1 - How To Use Automatic Shared Memory Management (ASMM) In Oracle10g In case you have enabled Automatic Memory Management , then to switch to Automatic Shared Memory Management , please follow below procedure SQL>Alter system set MEMORY_TARGET=0 scope=both;3. Manual Shared Memory Management – For the SGAIf you want complete control of individual SGA component sizes, you can disable both automatic memory management and automatic shared memory management. In this mode, you need to set the sizes of several individual SGA components, thereby determining the overall SGA size. You then manually tune these individual SGA components on an ongoing basis.In this case you set SGA_TARGET and MEMORY_TARGET to 0 and set value for other SGA components upto value of SGA_MAX_SIZE Please refer to Note 148495.1 - Dynamic SGA 4. Automatic PGA Memory Management – For the Instance PGAWhile using Automatic memory management , PGA memory is allocated based upon value of MEMORY_TARGET. In case you enable automatic shared memory management or manual shared memory management, you also implicitly enable automatic PGA memory management.Automatic/Manual PGA memory management is decided by initialization parameter WORKAREA_SIZE_POLICY which is a session- and system-level parameter that can take only two values: MANUAL or AUTO. The default is AUTO. With automatic PGA memory management, you set a target size for the instance PGA by defining value for parameter named PGA_AGGREGATE_TARGET and sizing of SQL work areas is automatic and all *_AREA_SIZE initialization parameters are ignored for these sessions. This feature is available from 9i. At any given time, the total amount of PGA memory available to active work areas on the instance is automatically derived from the parameter PGA_AGGREGATE_TARGET. This amount is set to the value of PGA_AGGREGATE_TARGET minus the PGA memory allocated for other purposes (for example, session memory). The resulting PGA memory is then allotted to individual active work areas based on their specific memory requirements. Please refer to following document for more details on Automatic PGA Memory Management Note 223730.1 - Automatic PGA Memory Managment in 9i and 10g 5.Manual PGA Memory Management – For the Instance PGAIn case you wish to manually specify the maximum work area size for each type of SQL operator (such as sort or hash-join) then you can enable Manual PGA Memory management.Set WORKAREA_SIZE_POLICY value to MANUAL and also specify values for *_area_size such as SORT_AREA_SIZE, HASH_AREA_SIZE, BITMAP_MERGE_AREA_SIZE, and CREATE_BITMAP_AREA_SIZE, etc. Although the Oracle Database 11g supports this manual PGA memory management method, Oracle strongly recommends that you leave automatic PGA memory management enabled. Table below summarizes the various memory management methods
The Automatic Memory Management (AMM) feature uses background process named Memory Manager (MMAN). This process was introduced in 10g which assisted in Automatic Shared Memory Management (ASMM) using SGA_TARGET. MMAN serves as the SGA Memory Broker and coordinates the sizing of the memory components. The SGA Memory Broker keeps track of the sizes of the components and pending resize operations |
How Do I Shrink Datafiles to Reclaim space?
There is probably a lot of available space that could be re-claimed by your database server operating system, but it is locked up in Oracle datafiles. Fortunately it is possible to shrink Oracle datafiles. This works in 10.2 and possibly earlier versions, but I am not sure - if you are on anything earlier than 10.2, you have other issues to worry about : )
-- This script was written by Tom Kyte and retrieved from asktom.oracle.com set verify off column file_name format a50 word_wrapped column smallest format 999,990 heading "SmallestSizePoss." column currsize format 999,990 heading "CurrentSize" column savings format 999,990 heading "Poss.Savings" break on report compute sum of savings on report column value new_val blksize select value from v$parameter where name = 'db_block_size' / select file_name, ceil( (nvl(hwm,1)*&&blksize)/1024/1024 ) smallest, ceil( blocks*&&blksize/1024/1024) currsize, ceil( blocks*&&blksize/1024/1024) - ceil( (nvl(hwm,1)*&&blksize)/1024/1024 ) savings from dba_data_files a, ( select file_id, max(block_id+blocks-1) hwm from dba_extents group by file_id ) b where a.file_id = b.file_id(+) / column cmd format a75 word_wrapped select 'alter database datafile '''file_name''' resize ' ceil( (nvl(hwm,1)*&&blksize)/1024/1024 ) 'm;' cmd from dba_data_files a, ( select file_id, max(block_id+blocks-1) hwm from dba_extents group by file_id ) b where a.file_id = b.file_id(+) and ceil( blocks*&&blksize/1024/1024) - ceil( (nvl(hwm,1)*&&blksize)/1024/1024 ) > 0 / |
ORA-03297: file contains used data beyond requested RESIZE value
you can set your datafile size up to HWM_BYTES columns or you can resize your HWM through alter table move + rebuild index or export and import.SQL> select bytes/1024 from dba_data_files where file_id = 6;BYTES/1024---------- 7168SQL> select sum(bytes/1024) from dba_segments where tablespace_name = 'EXAMPLE';SUM(BYTES/1024)--------------- 5440SQL> alter database datafile 'c:\oracle\product\10.1.0\oradata\db02\example01.dbf' resize 5500k;alter database*ERROR at line 1:ORA-03297: file contains used data beyond requested RESIZE valueYou can resize your datafile upto the HWM_BYTES column valueSQL> edWrote file afiedt.buf select a.file_name, a.bytes file_size_in_bytes, (c.block_id+(c.blocks-1)) * &BLOCK_SIZE HWM_BYTES, a.bytes - ((c.block_id+(c.blocks-1)) * &BLOCK_SIZE) SAVING from dba_data_files a, (select file_id,max(block_id) maximum from dba_extents group by file_id) b, dba_extents c where a.file_id = b.file_id and c.file_id = b.file_id and c.block_id = b.maximum and c.tablespace_name = 'EXAMPLE'SQL> /Enter value for _block_size: 8192old 4: (c.block_id+(c.blocks-1)) * &BLOCK_SIZE HWM_BYTES,new 4: (c.block_id+(c.blocks-1)) * 8192 HWM_BYTES,Enter value for _block_size: 8192old 5: a.bytes - ((c.block_id+(c.blocks-1)) * &BLOCK_SIZE) SAVINGnew 5: a.bytes - ((c.block_id+(c.blocks-1)) * 8192) SAVINGFILE_NAME FILE_SIZE_IN_BYTES HWM_BYTES SAVING-------------------------------- ------------------ ---------- ----------C:\ORACLE\PRODUCT\10.1.0\ORADATA\DB02\EXAMPLE01.DBF 7340032 6356992 983040SQL> alter database datafile 'c:\oracle\product\10.1.0\oradata\db02\example01.dbf' resize 6356992;Database altered. |
Free & Used Space in Tablespace from SQL
Run this sql statement SELECT /* + RULE */ df.tablespace_name "Tablespace", df.bytes / (1024 * 1024) "Size (MB)", SUM(fs.bytes) / (1024 * 1024) "Free (MB)", Nvl(Round(SUM(fs.bytes) * 100 / df.bytes),1) "% Free", Round((df.bytes - SUM(fs.bytes)) * 100 / df.bytes) "% Used" FROM dba_free_space fs, (SELECT tablespace_name,SUM(bytes) bytes FROM dba_data_files GROUP BY tablespace_name) df WHERE fs.tablespace_name (+) = df.tablespace_name GROUP BY df.tablespace_name,df.bytes UNION ALL SELECT /* + RULE */ df.tablespace_name tspace, fs.bytes / (1024 * 1024), SUM(df.bytes_free) / (1024 * 1024), Nvl(Round((SUM(fs.bytes) - df.bytes_used) * 100 / fs.bytes), 1), Round((SUM(fs.bytes) - df.bytes_free) * 100 / fs.bytes) FROM dba_temp_files fs, (SELECT tablespace_name,bytes_free,bytes_used FROM v$temp_space_header GROUP BY tablespace_name,bytes_free,bytes_used) df WHERE fs.tablespace_name (+) = df.tablespace_name GROUP BY df.tablespace_name,fs.bytes,df.bytes_free,df.bytes_used ORDER BY 4 DESC; |
Thursday, July 14, 2011
Number to text conversion from SQL
--- conversion of salary into words with decimal values-----
select sal,
decode(floor(sal),
0,'ZERO',
to_char(to_date(floor(sal),'J'),'JSP')) dollars,
decode(sal - floor(sal),
0,'ZERO',
to_char(to_date(((sal - floor(sal)) * 100),'J'),'JSP')) cents
from emp
--- conversion of salary into words without decimal values-----
select ename,sal,to_char(to_date(sal,'j'),'jsp')from emp;
NTP Failed with Oracle 11gR2 RAC on Linux
now add -x before -u see below
|

Solution for ORA-16191 on Primary Database with Dataguard
Calculate Dataguard required Bandwidth
|
GSD Is Used Only if 9i RAC Database is Present
|
Subscribe to:
Posts (Atom)